
Robert’s lovely 5th grade is about to embark on their annual study of fractions; I know many of you believe that teaching fractions is “forty miles of bad road,” and mark off the days until you finish going over the various “rules” that govern the different operations associated with them.
Ever the contrarian, Robert loves teaching fractions: he sees them as an opportunity to expand his students’ understanding of lots of mathematical topics, including ratios and proportions, probability, divisibility techniques and even geometry. Instead of seeing fractions as a crisis, consider it an opportunity!
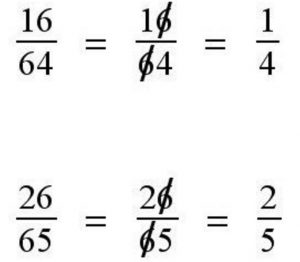
This “technique” for simplifying fractions shows up on my Pinterest boards with alarming regularity.
Robert’s study of fractions also gives him a chance to clear up misconceptions that students might still have about how ratios and proportions work. One of the most prevalent misconceptions is that equivalent fractions can be created by adding or subtracting the same amount from the numerators and denominators. Thus we have students who believe that 3/8 can be turned into 4/9 by adding 1 to both numbers. Of course this is horse hockey, but because Robert is a constructivist (as opposing to being an instructivist), he prefers to create “compelling contexts” that would prove this wrong.
One method to impart the idea that proportional relationships are multiplicative (as opposed to additive) is to teach students by counter-examples. That is, use an example that shows that adding the same amount to the two parts of a ratio will not result in a proportion, and give students to the opportunity to prove the relationship false on their own.
Now some teachers may say, “but this is going to take a long time; wouldn’t it be easier if I just told them?” Yes, it would be “easier,” but you didn’t go into this profession because it was easy, you went into this profession because you want to teach! And by having your students figure it out on their own, you are actually teaching them to think. What’s the danger of that?
Do these instructions look confusing? That’s because it’s not for a photocopier, but threading the bobbin on a sewing machine!
Robert likes to use visual models to help students understand this issue and you can do it very easily using a basic drawing program or a photocopy machine. In this case, Robert started with the 5th grade class photo and then put it onto the fancy copy machine with which he does battle on a regular basis. One of the features he has discovered is the panel that allows him to create an enlargement by setting the target size of the copy in inches independently, as opposed to percents proportionally.
Starting with the 5″ x 7″ photo, Robert changed the target sizes by adding 1″ to both the length and width of the photo: his new photos were 6″ x 8″, 7″ x 9″, 8″ x 10″, all the way up to 11″ x 13″ (the photocopier at his school goes up to tabloid size of 11″ x 13″; if yours doesn’t, then go to a copy show, where they can do it for you.) What do you think would happen if you enlarged a photo using this method?
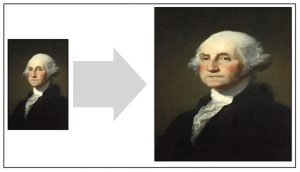
Poor George Washington gets the mumps treatment when his face is enlarged using the addition feature on the copy machine.
Robert distributed the photos to the students in pairs of 2; they pulled out the rulers and measured the photos to the nearest inch (he makes sure they are done in increments of 1″) and then records them in an organized table of values so that students can see the enlargement pattern. They notice that the width of the photo is always 2″ more than the height, and that enlarging the photo by adding the same amount to the width and height resulted in distortion, particularly as the photo got larger and larger.
His students then “see” for themselves the importance of proportions when enlarging a photo: if you double one side of the photo, you’ve got to do the same to the other side to keep it looking right: if not, the result is a photo that looks “stretched out.”
Robert completes this lesson by reviewing how a ratio is set up and how two ratios can be evaluated to see if they create a proportion by using a “scale factor.” He then gives his students 16 different frames to match up while calculating the scale factor on each one.
Now here’s a question for you: if you’ve ever shopped for photo frames, how come they’re never proportional? A 4″ x 5″ print can’t be enlarged to a 5″ x 7″ print, but it can be made into an 8″ x 10″ print, but that can’t be enlarged to fit an 11″ x 17″ frame, which can’t be enlarged to a 13″ x 17″ frame. What’s the deal with any of this?
This is more than silly mathematics, by the way: our entire technical world is made more annoying by the fact that few of our devices use screens that are proportional to one another: the videos we shoot on our smartphones are not proportional to our tv screens, the widescreen movies we see in theaters are not proportional to our tablets or our televisions. The result is those annoying “letterboxes” that have to be inserted on the top and bottom of movies, or those pervasive and confusing messages that tell us that the original movie had to be modified (read: cropped or stretched) to fit our screens.
If you’re interested in using this activity in your classroom, check out this activity that I’ve uploaded just the other day:
How did George Washington end up with looking like he had a wisdom tooth removed? The answer is: proportions!